如何估算不同规格的芯片 EP 部署 Deepseek 的单卡吞吐 V1.0
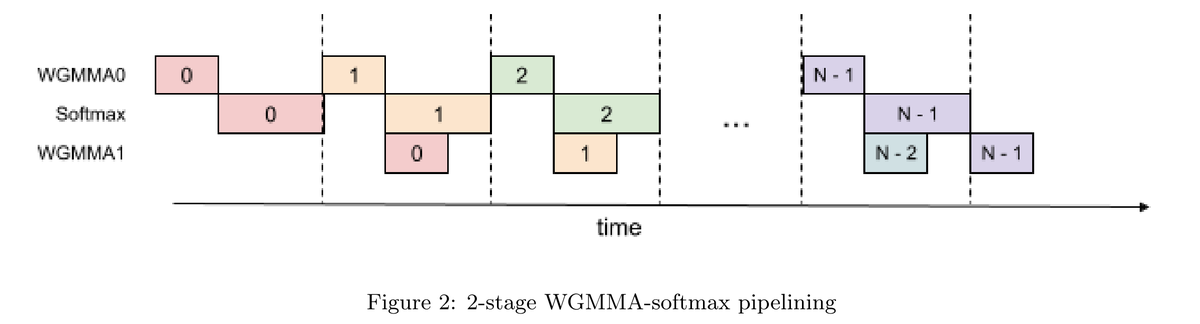 Image credit: Flash Attention 3
简介
与上一篇文章不同,本文主要目的是介绍模型的建模方法,以及搜索吞吐最大配置的方法。 TL;DR: H800、H20、A100、L20 的数据附在文末(不构成买卡建议)。
吞吐计算方法
本文采用的估算方法: 首先假设平均上下文长度为 5K (5K 上下文是参考 shen han 的文章:https://zhuanlan.zhihu.com/p/29841050824), 然后用 DRAM 容量作为约束,计算出最大的 batch size per card。 然后对单个 token 的延迟进行估算,得到 token per second。 最后计算单卡的吞吐 = batch size per card * token per second。
算法建模
为了简化,我只建模 Decoding 阶段,并且只计算稀疏层 (FFN 的 experts 多数为 routed expert 的层,一共 58 层) 的时间。 因为稠密层(FFN 全部为 shared expert 的层,一共 3 层) 占比很小,当前版本的模型直接用 sparse layer 的时间乘 61 层。
根据前期计算结果,下面几个算子/流水级在推理过程中时间占比最大。因此本模型对它们增加了可选的手动矫正,具体矫正方法在本小节后面介绍。
- FlashMLA
- 稀疏层 Dispatch 和 Combine 的时间
- GEMM
对矩阵运算,根据矩阵形状进行 MFU 修正后再用 Roofline 进行运行时间估算:
    # Compute time if memory-bound (data transfer limited)
    memory_time = total_bytes / mem_bw

    # Compute time if compute-bound (FLOP limited)
    compute_time = total_flops / flops

    return max(memory_time, compute_time)
Roofline 模型是一种用于分析计算程序性能上限的直观工具,通过结合硬件算力与内存带宽限制,揭示程序在不同计算密度下的性能瓶颈。
MFU:Model FLOPS Utilization = 模型推理过程所达到的 FLOPS / 硬件理论 FLOPS
FlashMLA MFU 矫正
我最初的矫正方法是乘上一个系数,使得最终的 flops 匹配 FlashMLA 公开的数据,后来感觉这么搞不是很靠谱。 现在的方法分为两部分,第一部分考虑 GEMM 和 Softmax 无法完全重叠的问题; 第二部分考虑矩阵形状(偏小)对 MFU 的影响。
建模GEMM 和 Softmax 无法完全重叠的问题
Flash attention V3 (FA3) 的论文 说因为编译器重排、寄存器压力等原因,Attention 的 2 个 GEMM 和 1 个 Softmax 无法完全 overlap, 只有其中一个 GEMM 和 Softmax 能够完美掩盖:

而理想情况下,下一代的推理芯片如果能完美掩盖,应该可以满足这样的流水化结果:

为此,我在建模硬件时,增加了 2 个参数:
        self.two_stage_fa3 = False
        self.three_stage_fa3 = False
对于未来的理想的推理芯片,我设置 three_stage_fa3 = True;
对于 H800/H20,我设置 two_stage_fa3 = True;
对于 L20/A100 等 Ada、Ampere 世代的卡,两个选项都是 False,因为直到 Hopper 才引入 wgmma.async,才能实现 FA3。
计算 MLA 时间的方法如下(与前面的两张图相对应):
        if hw.three_stage_fa3:
            compute_time = max(vector_time, all_gemms_time)
            not_overlapped_tensor_time = max(0, all_gemms_time - vector_time)
        elif hw.two_stage_fa3:
            compute_time = gemm_times[0] + max(vector_time, gemm_times[1])
            not_overlapped_tensor_time = gemm_times[0] + max(0, gemm_times[1] - vector_time)
        else:
            compute_time = all_gemms_time + vector_time
            not_overlapped_tensor_time = all_gemms_time
我不知道现在 CUDA 编译器有没有改进?H 卡/B 卡能不能实现 3-stage 的完美覆盖? 希望有相关信息的朋友在评论区或者 PM 戳我一下,我来观摩学习。
FlashMLA 手动 MFU 矫正
Flash Attention 只能在 SRAM 中计算,矩阵的典型尺寸是 M=128/256,K=576,N=512-4K, 两个 GEMM 都是不容易跑满的形状。 此版本的模型根据网上现有的数据进行粗暴的矫正: H20 由于其奇特的计算访存比,单独用 125/148 的矫技稀疏; 剩下的卡的计算访存比都(相对)与 H100 更为接近,因此暂时用 H100 的数据。
if hw.name.startswith("H20"):
    # https://github.com/deepseek-ai/FlashMLA/issues/30
    if self.q_len * self.head_count == 256 or self.q_len * self.head_count == 128:
        self.discount_factor = 125/148
    else:
        raise ValueError(f"Unsupported q_len * head_count: {self.q_len * self.head_count}")
else:
    # other GPUs have larger compute density, currently using H100 as reference
    # Using results from https://github.com/ai-bot-pro/achatbot/pull/123
    if self.q_len * self.head_count == 256:
        self.discount_factor = 550/989
    elif self.q_len * self.head_count == 128:
        self.discount_factor = 510/989
    else:
        raise ValueError(f"Unsupported q_len * head_count: {self.q_len * self.head_count}")
GEMM MFU 矫正
MoE 矩阵的 MFU 可以参考 DeepGEMM 给出的数据。 具体地,在生成 MoE 的 GEMM 时,给每个 GEMM 标注 discount factor:
def moe_factory(self, bs, dense=False):
    up_dim = self.dense_internal_dim if dense else self.moe_internal_dim
    # There are 2 up_project matrix here, so we can concat them at the N dimension
    moe_up_x2 = MMOp(bs, self.hid_dim, up_dim*2, elem_size=1, acc_size=4, name="moe_up_x2")
    moe_down = MMOp(bs, up_dim, self.ffn_output_dim, elem_size=1, acc_size=4, name="moe_down")

    if not self.use_deep_gemm_for_moe:
        return moe_up_x2, moe_down

    # else: apply deep gemm discount factor
    # using data from https://github.com/deepseek-ai/DeepGEMM
    if bs >= 1024:
        moe_up_x2.deep_gemm_disc_factor=1233/1979
        moe_down.deep_gemm_disc_factor=925/1979
    elif bs >= 512:
        moe_up_x2.deep_gemm_disc_factor=1040/1979
        moe_down.deep_gemm_disc_factor=916/1979
    elif bs >= 256:
        moe_up_x2.deep_gemm_disc_factor=932/1979
        moe_down.deep_gemm_disc_factor=815/1979
    elif bs >= 128:
        moe_up_x2.deep_gemm_disc_factor=533/1979
        moe_down.deep_gemm_disc_factor=510/1979
    else:  # using factor of 64
        moe_up_x2.deep_gemm_disc_factor=287/1979
        moe_down.deep_gemm_disc_factor=295/1979

    return moe_up_x2, moe_down
在计算 GEMM 延迟时,把 deep_gemm_disc_factor 带入:
    used_flops = hw.fp8_FLOPS if op.elem_size == 1 else hw.bf16_FLOPS

    discount_note = ""
    if op.elem_size == 1 and op.deep_gemm_disc_factor != 1:
        used_flops *= op.deep_gemm_disc_factor
        discount_note = f" with DeepGEMM discount factor {op.deep_gemm_disc_factor:.2f}"
对于不使用 DeepGEMM 的操作,按照 NV 官方的 A100 的 MFU 进行矫正。 我先挑选 M N K 中最小的一维,然后对官方的 MFU 曲线进行线性近似。 在此基础上,我打了一个补丁:在上面这个文档里,当矩阵的 M/N 较小的时候 MFU 不到 10%,但是 DeepGEMM 里形状相似的矩阵实际上可以达到更高的 MFU。 因此,我乐观地认为,当 K > 4096 且 M/N 中至少有一个大于 1536 时,经过恰当的优化可以达到 15% 的 MFU。
discount_factor = 0
if op.K < min(op.M, op.N):
    # determine the discount factor by K
    log_2_k = np.log2(op.K)
    slope = (200-50)/(9-6)  # from https://docs.nvidia.com/deeplearning/performance/dl-performance-matrix-multiplication/index.html
    if log_2_k >= 10:
        discount_factor = 260/312
    elif 6 <= log_2_k and log_2_k < 10:
        discount_factor = (50 + slope * (log_2_k - 6))/312
    else:
        # No operation in Deepseek has K < 64?
        assert op.K >= 64
        discount_factor = 50/312

    used_flops *= discount_factor
    discount_note = f" with K discount factor {discount_factor:.2f}"
else:
    # determine the discount factor by min(M, N)
    mn_min = min(op.M, op.N)
    log_2_min = np.log2(mn_min)
    slope = (230-30)/(11-8)  # from https://docs.nvidia.com/deeplearning/performance/dl-performance-matrix-multiplication/index.html
    if log_2_min >= 11:
        discount_factor = 260/312  # 312 is the peak flops of A100
    elif 8 <= log_2_min and log_2_min < 11:
        discount_factor = (30 + slope * (log_2_min - 8))/312  # 312 is the peak flops of A100
    else:
        discount_factor = 30/312

    if op.K > 4096 and (op.M >= 1536 or op.N >= 1536) and mn_min >= 64:
        # Data from NV might be too conservative.
        # As soon as one of M/N > 1536, it is possible to achieve ~15% MFU, according to https://github.com/deepseek-ai/DeepGEMM
        # So we assume disc factor is at least 289/1979
        discount_factor = max(discount_factor, 289/1979)

    used_flops *= discount_factor
    discount_note = f" with MN discount factor {discount_factor:.2f}"
网络建模
我根据 DeepEP 中的数据手动给网卡的有效带宽进行了赋值。其中 E810 不一定指具体的型号,只是为了代表一类较为便宜的 RoCE v2 网卡。
如果要建模 speculative decoding/MTP,记得在计算 dispatch 和 combine 的时间时把 q_seq_len 算上:effective batch size = batch size * q_seq_len。
class NIC:
    def __init__(self, name, bw):
        self.name = name
        self.bw = bw

class CX7(NIC):
    def __init__(self):
        super().__init__("CX7 400Gbps", 40 * 1024**3)

class E810(NIC):
    def __init__(self):
        super().__init__("E810 100Gbps", 10 * 1024**3)
RDMA 通信时间计算:
def compute_combine_latency(self, nic_bw, bs):
    combine_elem_size = self.non_moe_elem_size
    experts_to_combine = bs*self.sparse_expert_per_token
    combine_packet_size = self.hid_dim * combine_elem_size * experts_to_combine
    comibine_lat = compute_rdma_latency(nic_bw, combine_packet_size)

def compute_rdma_latency(card_effective_bw, tx_bw):  # both in Bytes/s
    latency = tx_bw / card_effective_bw
    return latency
GPU 建模
对建模 GPU 时用到的部分参数的解释:
fp8_FLOPS在 A100 这样的设备上用 int8 算力替代exp2_FLOPS和reduce_FLOPS由 SM 里的功能单元数量决定,在 CUDA 编程手册 里有具体的数值。这两个单元影响了 Softmax 的吞吐thread_all_reduce_latency用于模拟不用的 AI core/SM 在 SoC 级别做 reduce 的时间,我不确定用来建模 GPGPU 是否合适,主要是用于指导我自己的芯片规格制定。但是这部分的建模还略微粗糙,我还需要再多审视一下sram_sz影响了 Flash Attention 每次能切多长的 sequence,这对矩阵的形状、softmax rescale 的次数有影响,但是这部分我建模的方式还比较粗糙
class Hardware:
    def __init__(self, name):
        self.name = name
        self.mem_bw = 0
        self.bf16_FLOPS = 0
        self.fp8_FLOPS = 0
        self.exp2_FLOPS = 0
        self.reduce_FLOPS = 0
        self.thread_all_reduce_latency = 0.5 * 1e-6  # 0.5 us
        self.mem_sz = 0
        self.fp8_low_acc_precision = False
        self.sram_sz = 0
        self.two_stage_fa3 = False
        self.three_stage_fa3 = False
并行方式建模
我的模型不建模 Tensor Parallelism (TP),只建模简单的 Data Parallelism 和 Expert Parallelism,因为我设计的芯片没有 NVLink。 经过向 Zartbot 和 shen han 的学习,我意识到 H20的最优解大概率是需要开启 TP 的,所以本文 H20 的吞吐仅供参考。
具体来说,本文为了保证 QoS 达标的做法是降低 batch size,但是降低 batch size 会降低矩阵形状从而降低 MFU。 对于像 H20 这样受限于算力的卡,降低 batch size 能等比例地降低 core attention 的时间,但是很多左矩阵为“横条”的操作的时间无法被显著降低。 因此,实践中,为了不损失 MFU,大家会选择用 TP 来满足时延需求,大概率可以获得比降 bs 更好的效果。 举个例子:在 1 张卡上做 128x4096x4096 的操作受限于计算。如果降低一半的 bs,那么 1 张卡上的操作就变成 64x4096x4096,此时矩阵形状变差, MFU 下降,在最极端的情况下甚至可能损失 50% 的MFU,导致没有性能提升。 但是如果开启 TP=2,会在两张卡上做 128x4096x2048 的操作,此时矩阵形状还不错,仅仅损失了一些通信时间,对有 NVLink 的机器较为友好。
EP 数量用于计算每张卡的 expert 数量:
    def sparse_expert_per_card(self):
        return np.ceil(self.expert_count / self.ep_count)
sparse expert 就是大家常说的 routed expert
目前我建模了两种流水线:
- naive 流水线,不做任何 overlapping
- dual micro batch,就是官方公布的 EP144 所使用的 overlapping 方案
Naive 流水线计算时间是每一层的时间相加,而 dual micro batch 则是按照官方的方法来划分流水级。 目前 dual micro batch 的流水级划分在任何配置下都和官方公布的 EP144 的方式一致,没有做更多的设计空间探索。
理论上,可以根据时间的算子时间进一步调整流水级切分获得更好的性能

计算 token 时延时,用一个关键路径时间乘上 micro batch 的次数:
    def final_report(self, overall_lat, bs, micro_batch_count=1):
        overall_lat = overall_lat * micro_batch_count
        user_token_per_sec = 1 / (overall_lat * self.n_layers)
可选的参数配置
hist_len = 5 * Ki
cards = [H800(), H20(), A100(), L20()]
nics = [CX7(), E810()]
for dev in cards:
    for nic in nics:
        for speculative_decode_len in [0, 1]:
            for kvc_sz, non_moe_param_sz, deep_gemm in [(2, 2, True), (1, 2, True), (1, 1, True)]:
                for policy in ['dual-mbatch', 'naive']:
参数解释:
cards和nic就是 GPU 和网卡,不展开介绍。kvc_sz是 KV cache 的元素大小,如果用 fp8 就是 1,如果用 bf16 就是 2。non_moe_param_sz是除了 Expert 之外的参数的元素大小,如果用 fp8 就是 1,如果用 bf16 就是 2。- 当这两个参数都为 2 时,就是 Deepseek 官方的配置。
- 当
kvc_sz=1, non_moe_param_sz=2时,KV cache 的容量需求和访存带宽需求减半,但是 flashMLA 仍然用 bf16 计算,用 GPU 的 bf16 flops 来估算时间。 - 当
kvc_sz=1, non_moe_param_sz=1时,flashMLA 改为用 fp8 计算。
deep_gemm如果设为True,MoE 计算时会用 DeepGEMM 提供的数据对 MoE 层的 GPU 的 fp8 flops 进行矫正,否则就用 NV 提供的 A100 的 MFU 数据进行矫正。
推测解码
speculative_decode_len 是指利用 Deepseek 自带 eagle-like layer 进行推测解码的长度。
对计算机体系结构背景的同学,可以用分支预测器类比来理解LLM的推测解码(Speculative Decoding): 推测解码相当于在语言模型推理时引入"分支预测+乱序执行"机制:用小模型(快速但低精度)预测未来token(类似分支预测器),用大模型(慢速但高精度)并行验证(类似ALU执行),通过验证命中率换取整体加速。区别在于,推测错误在 CPU 中会回滚流水线,而在 LLM 中则会占用额外的计算资源。
eagle layer 是一种特殊的 Transformer 层,用大模型最后一层的 feature (属于第 N-1 个 token) 和预测出来的第 N 个 token 作为输入,再进行一次自回归解码。这种范式是目前准确率最高的推测解码方法。 eagle-like layer 是 Deepseek V3 里用到的结构,和 eagle layer 略有不同。
在端侧,speculative_decode_len 可以配置得很长,从而提升单用户的延迟。
在云侧,speculative_decode_len 一般设置为 0-1,因为云侧追求吞吐,而推测错误损失吞吐。
我在建模时设置 q_seq_len = 1 + speculative_decode_len,
增大该参数会增加 MoE 层的 batch size,增大 Attention Projection 的 batch size,增大计算 qK^T 时 q 矩阵的 M 维,
从而使得任务更加计算密集。
在一定范围内,M 更大,矩阵计算的 MFU 更高。因此对很多操作而言,开启推测解码可以提升计算强度,“白嫖”一些吞吐。
在网络通信方面则无法白嫖,因为无论你的推测解码的预测是否正确,都会增加网络通信的负担,向 Routed Expert 发送的报文数量也会随之增加。
speculative_decode_len 也会影响最终的 ux_tps(user-experienced token per second)和有效吞吐:
overall_lat = overall_lat * micro_batch_count
raw_token_per_sec = 1 / (overall_lat * self.n_layers)
print(f"Per layer time per user: {overall_lat*10**6:.2f} us")
print(f"Per forward pass time per user: {overall_lat*10**3 * self.n_layers:.2f} ms")
print(f"Raw token per second: {raw_token_per_sec:.2f}")
# self.q_seq_len - 1 == speculative decode length
speculation_success_token_count = 0
for i in range(1, self.q_seq_len):
    speculation_success_token_count += pow(0.85, i)
ux_tps = raw_token_per_sec * (1 + speculation_success_token_count)
print(f"User experienced token per second: {ux_tps:.2f}, speculation success token count: {speculation_success_token_count:.2f}")

throughput = raw_token_per_sec * bs * (1 + speculation_success_token_count)
其中 0.85 是 Deepseek V3 TR 里面给出的值,和目前 SOTA 的推测解码方法报告的数值相符(Eagle2、HASS 和 EAGLE-3)。
配置搜索
搜索的目标是最大化吞吐,约束是 Batch size 不能太大导致 DRAM 装不下 KV cache,如果爆了就降低 batch size。
第二个约束是 QoS 约束(ux_tps:user-experienced token per second),如果 ux_tps < target_ux_tps 就降低 batch size。
ux_tps = 0
bs = 128 + 8

while ux_tps < target_ux_tps and bs > 8:
    bs -= 8
    if policy == 'dual-mbatch':
        ds = DeepSeekV3(hist_len, 1 + speculative_decode_len, bs, kvc_elem_size=kvc_sz, non_moe_param_elem_size=non_moe_param_sz)
        ds.promo_discount = promotion
        ds.ep_count = ep
        if bs > ds.compute_max_bs_per_card_by_mem_size(dev):
            continue
        ux_tps, throughput = ds.model_dual_micro_batch_decode(bs, dev, nic.bw)
    else:
        assert policy == 'naive'
        ds = DeepSeekV3NaiveDecode(hist_len, 1 + speculative_decode_len, bs,  kvc_elem_size=kvc_sz, non_moe_param_elem_size=non_moe_param_sz)
        ds.promo_discount = promotion
        ds.ep_count = ep
        if bs > ds.compute_max_bs_per_card_by_mem_size(dev):
            continue
        ux_tps, throughput = ds.model_naive_decode(bs, dev, nic.bw)

if ux_tps >= target_ux_tps and bs > 8:
    perf_results.append([dev.name, nic.name, policy, ep, kvc_sz, non_moe_param_sz, bs, promotion, ux_tps, throughput, speculative_decode_len])
方案搜索结果
去重:
df = df.sort_values(by=['Throughput Per card'], ascending=False).drop_duplicates(subset=['GPU', 'NIC', 'EP', 'Non-expert param elem size'], keep='first')
TPS > 20 的方案:
| GPU | NIC | Pipe policy | EP | KVC elem size | Non-expert param elem size | BS | DeepGemm | UX TPS | Throughput Per card | MTP Len |
|---|---|---|---|---|---|---|---|---|---|---|
| H800 | CX7 400Gbps | dual-mbatch | 320 | 1 | 1 | 128 | TRUE | 28.9283602 | 3702.83011 | 1 |
| H800 | CX7 400Gbps | dual-mbatch | 144 | 1 | 1 | 128 | TRUE | 25.3533733 | 3245.23178 | 1 |
| H800 | CX7 400Gbps | dual-mbatch | 320 | 1 | 2 | 128 | TRUE | 20.5797242 | 2634.2047 | 0 |
| H800 | CX7 400Gbps | dual-mbatch | 72 | 1 | 1 | 128 | TRUE | 20.3288631 | 2602.09448 | 1 |
| H800 | CX7 400Gbps | dual-mbatch | 144 | 1 | 2 | 80 | TRUE | 28.3847954 | 2270.78363 | 1 |
| H800 | CX7 400Gbps | dual-mbatch | 72 | 2 | 2 | 88 | TRUE | 21.631899 | 1903.60711 | 1 |
| H800 | E810 100Gbps | dual-mbatch | 320 | 1 | 1 | 64 | TRUE | 22.4657618 | 1437.80876 | 0 |
| A100 | CX7 400Gbps | dual-mbatch | 320 | 1 | 1 | 64 | TRUE | 21.8744074 | 1399.96207 | 1 |
| H800 | E810 100Gbps | dual-mbatch | 144 | 1 | 1 | 64 | TRUE | 21.130419 | 1352.34682 | 0 |
| A100 | CX7 400Gbps | naive | 144 | 1 | 1 | 56 | TRUE | 21.0442842 | 1178.47991 | 1 |
| H800 | E810 100Gbps | dual-mbatch | 72 | 1 | 1 | 32 | TRUE | 34.9379234 | 1118.01355 | 1 |
| A100 | CX7 400Gbps | naive | 72 | 1 | 1 | 32 | TRUE | 31.2735432 | 1000.75338 | 1 |
| H800 | E810 100Gbps | dual-mbatch | 320 | 1 | 2 | 40 | TRUE | 23.7693815 | 950.775262 | 0 |
| H20 | CX7 400Gbps | naive | 320 | 1 | 1 | 40 | TRUE | 22.2571103 | 890.284412 | 1 |
| H800 | E810 100Gbps | dual-mbatch | 144 | 2 | 2 | 40 | TRUE | 22.1981281 | 887.925125 | 0 |
| A100 | E810 100Gbps | dual-mbatch | 320 | 1 | 1 | 40 | TRUE | 20.423625 | 816.945001 | 1 |
| H800 | E810 100Gbps | dual-mbatch | 72 | 2 | 2 | 32 | TRUE | 25.0675241 | 802.16077 | 1 |
| H20 | CX7 400Gbps | naive | 144 | 1 | 1 | 32 | TRUE | 23.9194245 | 765.421585 | 1 |
| A100 | CX7 400Gbps | naive | 320 | 1 | 2 | 32 | TRUE | 23.7288273 | 759.322475 | 1 |
| A100 | E810 100Gbps | naive | 144 | 1 | 1 | 32 | TRUE | 22.6969865 | 726.303569 | 1 |
| A100 | CX7 400Gbps | naive | 144 | 2 | 2 | 32 | TRUE | 22.4446861 | 718.229954 | 1 |
| A100 | E810 100Gbps | naive | 72 | 1 | 1 | 32 | TRUE | 20.4578472 | 654.65111 | 1 |
| A100 | CX7 400Gbps | naive | 72 | 2 | 2 | 32 | TRUE | 20.2526468 | 648.084699 | 1 |
| H20 | E810 100Gbps | naive | 320 | 1 | 1 | 16 | TRUE | 24.8169232 | 397.070771 | 1 |
| H20 | E810 100Gbps | naive | 144 | 1 | 1 | 16 | TRUE | 22.4215763 | 358.74522 | 1 |
| A100 | E810 100Gbps | naive | 320 | 2 | 2 | 16 | TRUE | 21.6367524 | 346.188039 | 1 |
| L20 | CX7 400Gbps | naive | 320 | 1 | 1 | 16 | TRUE | 21.4384945 | 343.015912 | 1 |
| H20 | CX7 400Gbps | naive | 72 | 1 | 1 | 16 | TRUE | 21.1636852 | 338.618962 | 1 |
| A100 | E810 100Gbps | naive | 144 | 1 | 2 | 16 | TRUE | 20.7212298 | 331.539677 | 1 |
TPS > 15 的方案:
| GPU | NIC | Pipe policy | EP | KVC elem size | Non-expert param elem size | BS | DeepGemm | UX TPS | Throughput Per card | MTP Len |
|---|---|---|---|---|---|---|---|---|---|---|
| H800 | CX7 400Gbps | dual-mbatch | 320 | 1 | 1 | 128 | TRUE | 28.9283602 | 3702.83011 | 1 |
| H800 | CX7 400Gbps | dual-mbatch | 144 | 1 | 1 | 128 | TRUE | 25.3533733 | 3245.23178 | 1 |
| H800 | CX7 400Gbps | dual-mbatch | 320 | 2 | 2 | 128 | TRUE | 20.5797242 | 2634.2047 | 0 |
| H800 | CX7 400Gbps | dual-mbatch | 72 | 1 | 1 | 128 | TRUE | 20.3288631 | 2602.09448 | 1 |
| H800 | CX7 400Gbps | dual-mbatch | 144 | 1 | 2 | 128 | TRUE | 18.6497315 | 2387.16563 | 0 |
| H800 | CX7 400Gbps | dual-mbatch | 72 | 1 | 2 | 128 | TRUE | 15.70421 | 2010.13888 | 0 |
| H800 | E810 100Gbps | dual-mbatch | 320 | 1 | 1 | 72 | TRUE | 19.9695661 | 1437.80876 | 0 |
| A100 | CX7 400Gbps | dual-mbatch | 320 | 1 | 1 | 72 | TRUE | 19.4439177 | 1399.96207 | 1 |
| H800 | E810 100Gbps | dual-mbatch | 144 | 1 | 1 | 64 | TRUE | 21.130419 | 1352.34682 | 0 |
| A100 | CX7 400Gbps | naive | 144 | 1 | 1 | 80 | TRUE | 15.2895567 | 1223.16454 | 1 |
| H800 | E810 100Gbps | dual-mbatch | 72 | 1 | 1 | 64 | TRUE | 18.885364 | 1208.6633 | 0 |
| A100 | CX7 400Gbps | naive | 72 | 1 | 1 | 64 | TRUE | 16.1541242 | 1033.86395 | 1 |
| A100 | E810 100Gbps | dual-mbatch | 320 | 1 | 1 | 64 | TRUE | 15.9938678 | 1023.60754 | 1 |
| H800 | E810 100Gbps | dual-mbatch | 320 | 1 | 2 | 64 | TRUE | 15.2994591 | 979.165382 | 0 |
| H20 | CX7 400Gbps | naive | 320 | 1 | 1 | 56 | TRUE | 16.033771 | 897.891177 | 1 |
| H800 | E810 100Gbps | dual-mbatch | 144 | 2 | 2 | 48 | TRUE | 18.4984401 | 887.925125 | 0 |
| H800 | E810 100Gbps | dual-mbatch | 72 | 2 | 2 | 48 | TRUE | 16.7116827 | 802.16077 | 1 |
| H20 | CX7 400Gbps | naive | 144 | 1 | 1 | 48 | TRUE | 16.3711618 | 785.815766 | 1 |
| A100 | E810 100Gbps | dual-mbatch | 144 | 1 | 1 | 48 | TRUE | 15.931457 | 764.709937 | 1 |
| A100 | CX7 400Gbps | naive | 320 | 1 | 2 | 48 | TRUE | 15.8192182 | 759.322475 | 1 |
| A100 | CX7 400Gbps | naive | 144 | 1 | 2 | 32 | TRUE | 22.4446861 | 718.229954 | 1 |
| A100 | E810 100Gbps | naive | 72 | 1 | 1 | 32 | TRUE | 20.4578472 | 654.65111 | 1 |
| A100 | CX7 400Gbps | naive | 72 | 2 | 2 | 32 | TRUE | 20.2526468 | 648.084699 | 1 |
| H20 | CX7 400Gbps | naive | 72 | 1 | 1 | 40 | TRUE | 15.6273132 | 625.092527 | 1 |
| H20 | E810 100Gbps | naive | 320 | 1 | 1 | 40 | TRUE | 15.2252911 | 609.011643 | 1 |
| L20 | CX7 400Gbps | naive | 320 | 1 | 1 | 40 | TRUE | 15.1643212 | 606.57285 | 1 |
| H20 | E810 100Gbps | naive | 144 | 1 | 1 | 32 | TRUE | 17.3529462 | 555.294279 | 1 |
| L20 | CX7 400Gbps | naive | 144 | 1 | 1 | 32 | TRUE | 16.6618724 | 533.179916 | 1 |
| H20 | CX7 400Gbps | naive | 320 | 1 | 2 | 32 | TRUE | 15.5128535 | 496.411312 | 1 |
| A100 | E810 100Gbps | dual-mbatch | 320 | 1 | 2 | 32 | TRUE | 15.0206838 | 480.661883 | 1 |
| A100 | E810 100Gbps | naive | 144 | 2 | 2 | 24 | TRUE | 15.7915907 | 378.998177 | 1 |
| L20 | E810 100Gbps | naive | 320 | 1 | 1 | 24 | TRUE | 15.2261985 | 365.428764 | 1 |
| A100 | E810 100Gbps | naive | 72 | 1 | 2 | 16 | TRUE | 19.1044821 | 305.671713 | 1 |
| H20 | E810 100Gbps | naive | 72 | 1 | 1 | 16 | TRUE | 18.7936278 | 300.698045 | 1 |
| L20 | E810 100Gbps | naive | 144 | 1 | 1 | 16 | TRUE | 17.5424449 | 280.679118 | 1 |
| L20 | CX7 400Gbps | naive | 72 | 1 | 1 | 16 | TRUE | 15.9643624 | 255.429798 | 1 |
| H20 | CX7 400Gbps | naive | 144 | 2 | 2 | 16 | TRUE | 15.4392247 | 247.027596 | 1 |
本文同步发表于 ShineZ的博客,因为是用 Markdown 转换为 Word 之后发布到知乎,知乎文章的排版可能略有瑕疵。
Zhou, Yaoyang
Architect of LLM DSA; Maintainer of u-arch simulator for Xiangshan; PhD of Computer Architecture
I specialize in LLM DSA and CPU micro-architecture.